





Website Redesign Checklist: How to Redesign Without Losing Your Google Rankings

This website redesign checklist shows you how to redesign your website without losing Google rankings. The trick is to treat the job as an SEO migration project instead of a design project. In fact, the rankings lost after a redesign are rarely caused by the new design. Instead, they are lost because of mistakes left untreated before launch.
Below are 19 actionable steps, grouped into five phases, that take you from your first spreadsheet to 90 days after launch. Each step names the exact tool and menu to open, so you can follow it yourself or hand it to your developer.
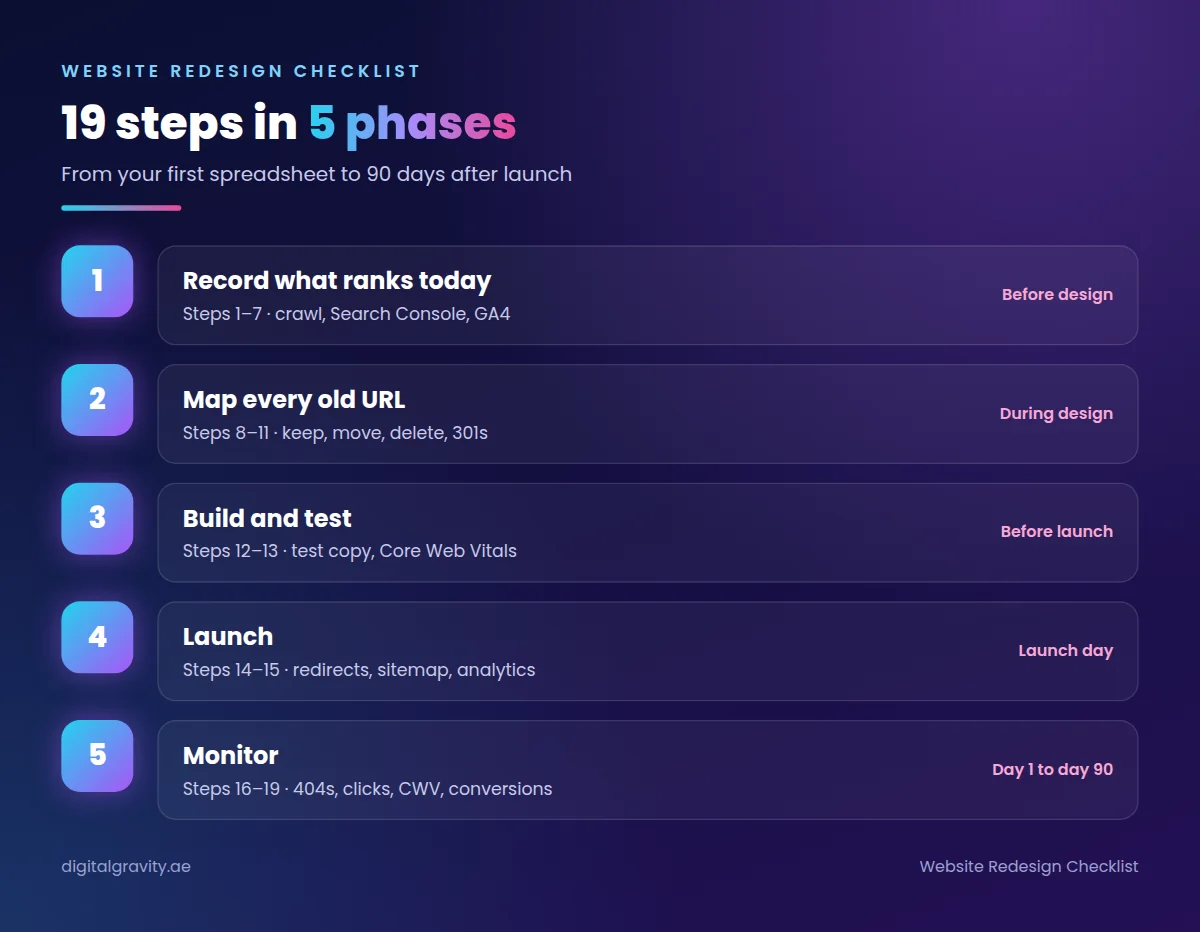
Website Redesign Checklist Summary: All 19 Steps
Use this table as your quick reference. After that, the sections below explain every step in detail.
| Phase | Steps | Main tool | When | Output |
|---|---|---|---|---|
| 1. Record what ranks today | 1 to 7 | Screaming Frog, Search Console, GA4 | Before design starts | A full URL sheet with important pages marked yellow |
| 2. Map every old URL | 8 to 11 | Your URL sheet, CMS editor | During design | A keep, move or delete decision and a 301 redirect list |
| 3. Build and test | 12 to 13 | Password-protected test copy, Lighthouse | Before launch | A test copy that matches the old site’s search details |
| 4. Launch | 14 to 15 | Search Console, GA4 Realtime | Launch day | Live redirects, a submitted sitemap and working analytics |
| 5. Monitor | 16 to 19 | Search Console, GA4 | Day 1 to day 90 | Fixed 404 errors and a conversion comparison |
Website Redesign Checklist Phase 1: Record What Ranks Today
Steps 1 to 7 capture everything Google currently knows about your site. As a result, you have a record to check the new site against.
Step 1: Create Your Spreadsheet
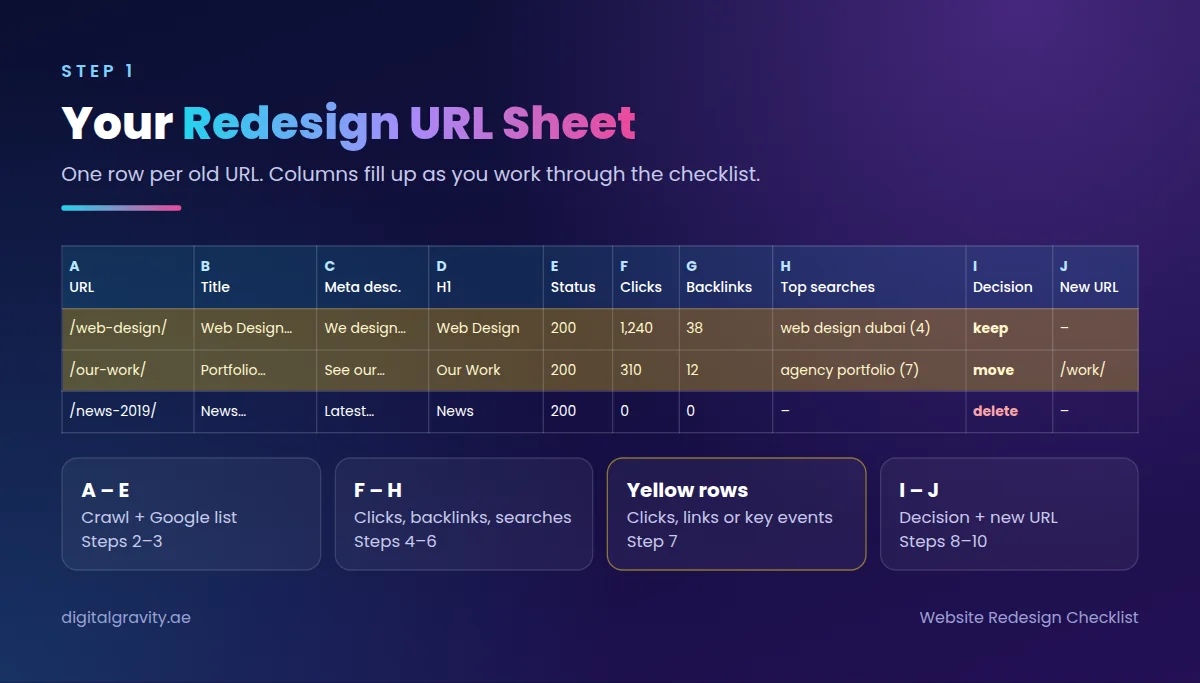
You create this file before anything else. First, open Google Sheets or Excel and name the file Redesign URL Sheet. Each row will hold one URL from your old site. Then, in row 1, type these column names:
A: URL
B: Title
C: Meta description
D: H1
E: Status code
F: Clicks
G: Backlinks
H: Top searches
I: Decision
J: New URL
You fill columns A to E in steps 2 and 3, F to H in steps 4 to 6, and I and J in steps 8 to 10.
Step 2: Crawl Your Live Site
Download Screaming Frog SEO Spider, which crawls up to 500 URLs for free. Next, type your live site address into the top bar and click Start. The crawler opens your homepage, follows the links to the next pages and records what it finds on each page.
When it finishes, click the Internal tab, choose the HTML filter and click Export. Finally, copy the columns Address, Title 1, Meta Description 1, H1-1 and Status Code into columns A to E of your spreadsheet.
Step 3: Add Google’s URL List
Your crawler only finds pages that a link leads to. However, Google sometimes knows pages that no link leads to. So open Search Console, click Pages under Indexing, then click View data about indexed pages below the chart and click Export. Keep in mind that this export is limited to 1,000 rows, so larger sites should also export their XML sitemap URLs.
Open the exported file, copy the URLs and paste them under the last row of column A. Then select column A and use Remove duplicates.
Some rows now have an empty Title cell. Those are pages your crawler missed. In Screaming Frog, click Mode, then List, then Upload, then Paste, and paste those URLs. Click Start, then copy the results into columns B to E.
Step 4: Export Page Clicks
Stay in Search Console for steps 4, 5 and 6. First, click Performance, then Search results. Set the date range to 16 months, which is the longest Search Console keeps. Then scroll to the table, click the Pages tab and click Export. Paste the export into a new tab named Clicks.
Back in your main tab, type this formula in F2 and drag it down:
=IFERROR(VLOOKUP(A2,Clicks!A:B,2,FALSE),0)
Column F now shows the clicks each URL received.
Step 5: Export Backlinks
Click Links in Search Console, then External links, then Top linked pages, then Export. After that, paste the export into a new tab named Links. In G2, type this formula and drag it down:
=IFERROR(VLOOKUP(A2,Links!A:B,2,FALSE),0)
Column G now shows how many outside sites link to each URL.
Step 6: Record Top Searches
Go back to Performance in Search Console. Then click the filter button above the chart, choose Page, choose URL exactly, paste one URL from column A and click Apply. Next, click the Queries tab.
This tab shows the searches that bring people to that page and the average position each search gets. Copy the top five searches with their positions into column H. For example, start with the 20 pages that have the most clicks in column F.
Step 7: Mark Important Pages
You leave Search Console here and open GA4. Go to Reports, then Engagement, then Pages and screens. Set the same 16-month date range, then click the download icon at the top right and choose CSV.
GA4 lists page paths instead of full URLs, so match them to column A by the ending of the address. In your spreadsheet, colour a row yellow if it has any of these:
- a number above 0 in column F
- a number above 0 in column G
- a number above 0 in the Key events column of the GA4 file
Yellow rows are your important pages.
Website Redesign Checklist Phase 2: Map Every Old URL
Steps 8 to 11 decide where every old page goes. In other words, this is the part that protects your rankings most directly.
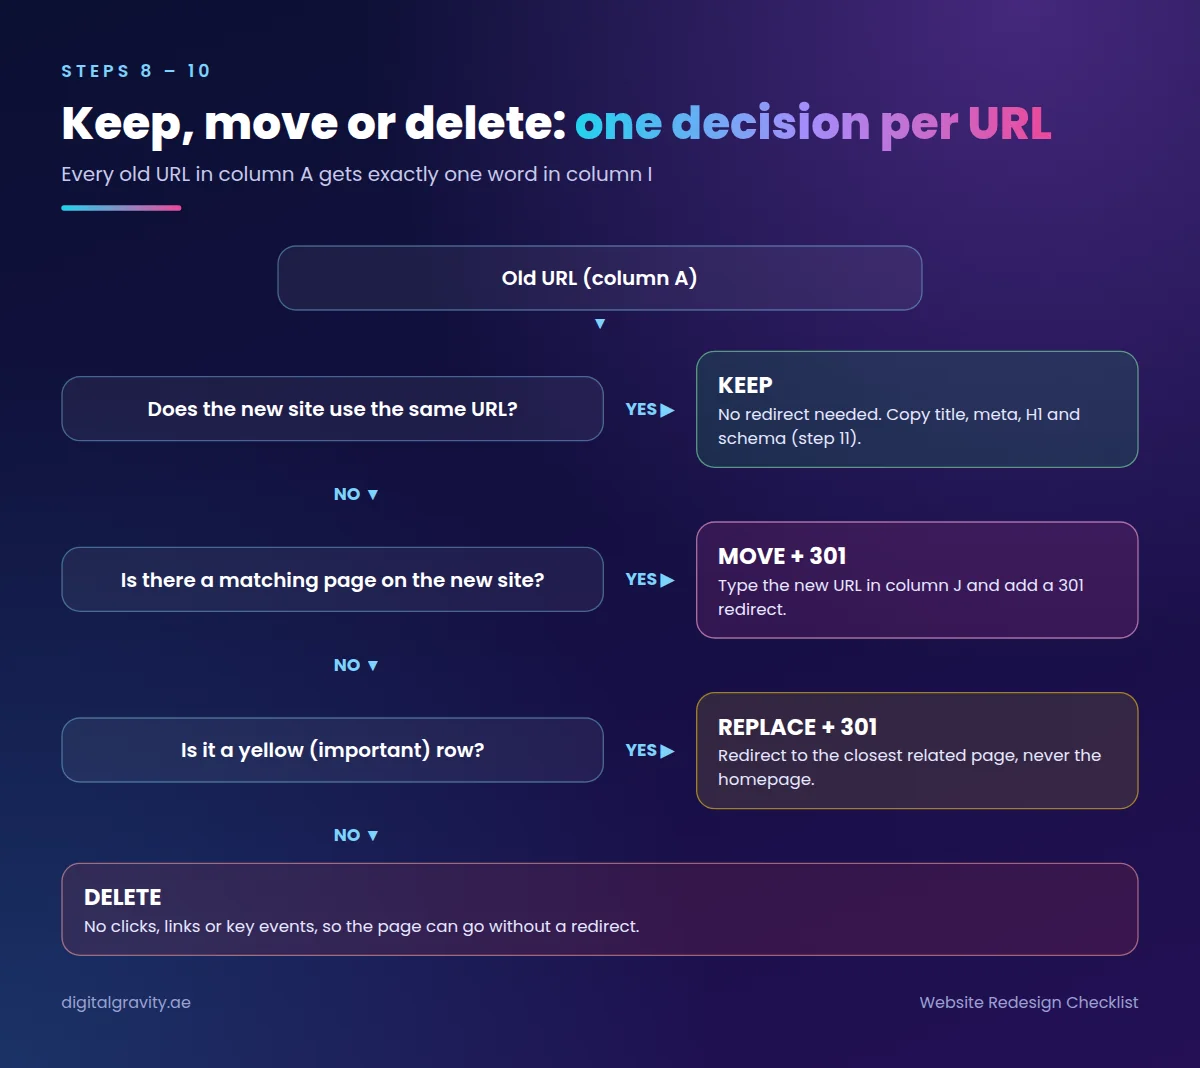
Step 8: Choose What Happens to Each Old URL
Look at your plan for the new site’s pages, then type one word in column I for every row:
keep if the new site uses the same URL
move if the new site uses a different URL, and type that new URL in column J
delete if the new site has no such page
However, a yellow row never gets delete without a replacement. If you remove an important page, type the closest related page in column J.
Step 9: Keep Your Important Pages on the Same URLs
You mark a yellow page move only if the new website platform cannot use the old URL. Otherwise, it stays on the same URL. This matters because Google ranks a URL, and a new URL starts with no ranking history.
Step 10: Create Your 301 Redirects
A 301 redirect is a rule on your website that sends visitors and Google from an old URL to a new one. Without it, an old URL shows an error page and its ranking history is lost.
Your web development team adds these rules to the new site. On a WordPress website, a plugin such as Redirection does the same job. Give the developer a list of every row marked move, plus every delete row that has a replacement in column J. Column A is the old URL and column J is where it goes.
Also, keep the redirects live for a long time. Google’s site move guidelines recommend keeping them for at least one year, so that every signal can pass to the new URLs.
Step 11: Copy Search Details Onto the New Pages
Search details are the four items Google reads on a page. Copy them from the old page to the matching new page:
Title, meta description and H1: copy them from columns B, C and D and paste them into the new page’s title, description and heading fields in your website editor.
Structured data and hreflang: open the old page, right-click, choose View page source and press Ctrl+F. Search for ld+json to find structured data and for hreflang to find language tags. Then copy those code blocks into the new page’s template.
Website Redesign Checklist Phase 3: Build and Test the New Site
Steps 12 and 13 catch problems on a private copy, before Google or your customers ever see them.
Step 12: Build and Crawl the Test Copy
A test copy is a private version of your new site on a separate web address. It has a password, so Google cannot find it. Ask your developer to set that up.
Then open Screaming Frog, the same one from step 2, and type the test copy’s address. Click Start, and enter the username and password when the crawler asks. Finally, export the same five columns into a new tab named Test.
Next, go row by row through every keep and move row in your main tab and find its new URL in the Test tab. The status code should be 200, and the title, meta description and H1 should match columns B, C and D. Fix each mismatch before launch.
Step 13: Test Speed on a Real Phone
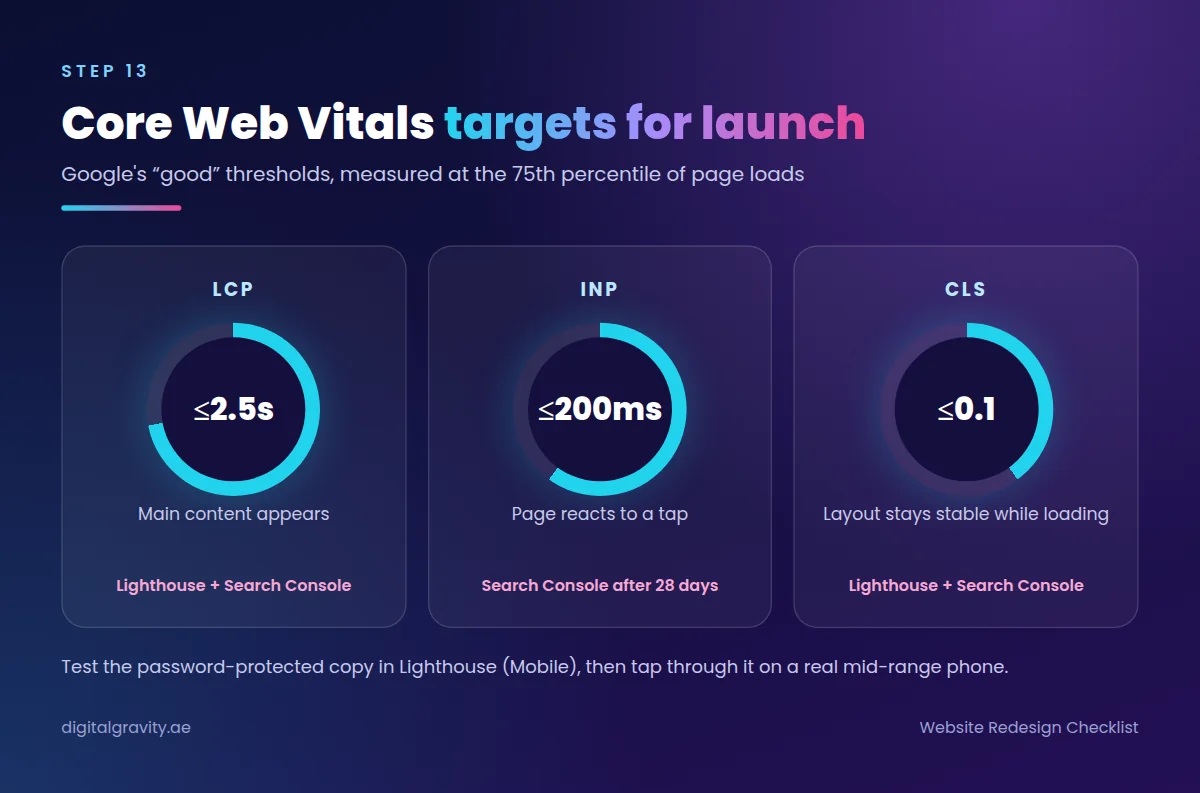
Open the test copy in Chrome on your computer. Right-click, choose Inspect, click Lighthouse, choose Mobile and click Analyze. Then open the same pages on a real mid-range phone and tap through them. Your targets, based on Google’s Core Web Vitals thresholds, are:
- main content appears in under 2.5 seconds (LCP)
- the page reacts to a tap in under 200 milliseconds (INP)
- the layout moves by less than 0.1 while loading (CLS)
Lighthouse shows LCP and CLS. By contrast, INP appears in step 18, once real visitors have used the site. If the new design struggles on phones, a responsive website design review before launch is cheaper than a ranking drop after it.
Website Redesign Checklist Phase 4: Launch Day
Steps 14 and 15 happen on the day you switch over. Therefore, follow them in the exact order below.
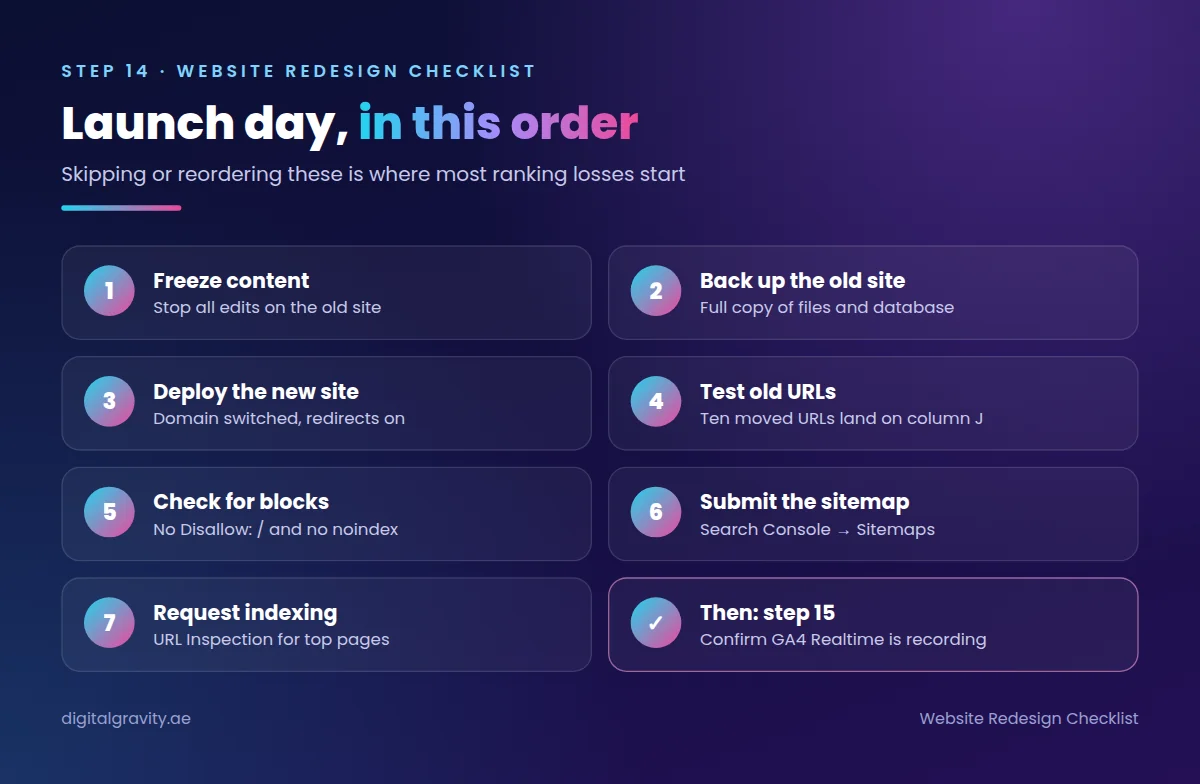
Step 14: Launch in This Order
1- Freeze content: Stop all edits on the old site so nothing is lost.
2- Back up the old site: Ask your host for a full copy of the files and database.
3- Deploy the new site: Your developer switches your domain to the new site with the redirects turned on.
4- Test old URLs: Paste ten move URLs from column A into a browser. Each must land on its column J page.
5- Check for blocks: Open yourdomain.com/robots.txt and confirm that there is no line that says Disallow: /. Then view the source of a new page, press Ctrl+F and search noindex. It should not appear.
6- Submit the sitemap: In Search Console, click Sitemaps, type sitemap.xml and click Submit.
7- Request indexing: In Search Console, paste one yellow URL into the search bar at the top, then click Request indexing. Repeat for your top pages.
Step 15: Confirm Analytics Is Recording
Open GA4, click Reports, then Realtime. Next, open your new site in another browser tab. You should appear as one active user. Then submit a test form or complete a test purchase and confirm its event shows in Realtime.
After that, add a tab named Launch log to your spreadsheet and type the launch date. Step 19 needs that date.
Website Redesign Checklist Phase 5: Monitor for 90 Days
Steps 16 to 19 find problems while they are still small. For ongoing support after this window, a website maintenance plan keeps the same checks running.
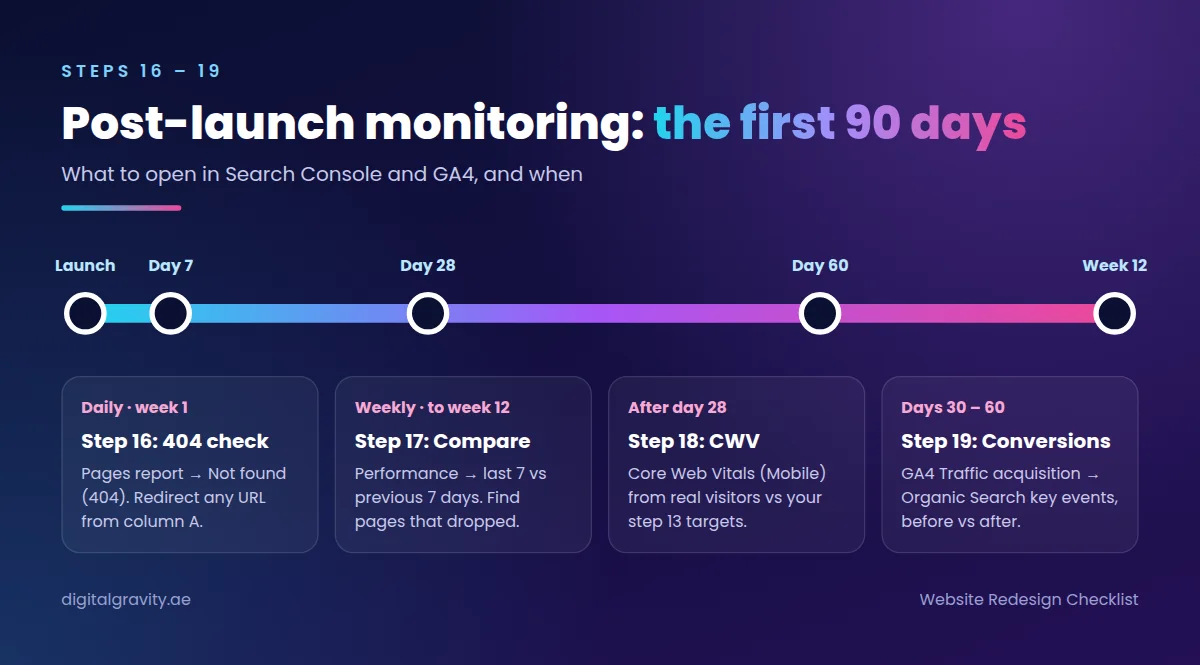
Step 16: Check Daily in Week 1
Once a day for seven days, open Search Console, then Indexing, then Pages. Click the row named Not found (404). If a URL listed there appears in column A of your spreadsheet, ask your developer to add a 301 redirect for it.
Step 17: Check Weekly Through Week 12
Once a week, open Performance in Search Console. Click the date filter, choose Compare and pick the last 7 days against the previous 7 days. Then look at the Clicks and Impressions totals.
If either falls, click the Pages tab to find which page dropped. Then fix that page’s redirect or indexing error.
Step 18: Open Core Web Vitals After 28 Days
In Search Console, click Core Web Vitals under Experience, then choose Mobile. This report uses Chrome data from real visitors over the last 28 days. So it shows nothing about the new site until 28 days after launch. After that, compare its LCP, INP and CLS numbers with the targets in step 13.
Step 19: Compare Organic Conversions After 30 to 60 Days
In GA4, click Reports, then Acquisition, then Traffic acquisition. Set the date range to days 30 to 60 after your launch date from step 15. Then turn on Compare with a period of the same length before launch.
In the row named Organic Search, compare the Key events column across the two periods. If the number after launch is lower, use step 17 to find which pages lost clicks.
The Exact Reason a Website Redesign Hurts SEO
Google ranks individual URLs, not your website as an abstract whole. Every signal a page has built up is attached to that specific address. That includes backlinks, internal links, engagement history and its place in Google’s index.
Consequently, a redesign that changes, removes or breaks those addresses resets those signals, unless you tell Google exactly where each page has moved. If you are still shaping the bigger plan, our guide to a website redesign strategy covers goals, branding and personas.
6 Redesign Mistakes That Lower Google Rankings
- You redirect old pages to the homepage. Google says this can be treated as a soft 404.
- You delete top pages without redirects, making backlinks disappear.
- You leave noindex on the live site.
- You change URLs without a redirect map.
- You ignore mobile performance, even when the website loads slowly on phones.
- You don’t monitor Search Console after launch, and that can cost you a lot by month three.
Budget and timing mistakes matter too. For planning numbers, see how much website redesign costs in Dubai and how long it takes to build a website in Dubai.
How Digital Gravity Protects Your Google Rankings in a Redesign
Our team plans these four phases during the first week of every redesign project.
I. Pre-Redesign Audit
Before design begins, we:
1- crawl your site
2- list its content
3- export Search Console data
4- match each old URL to one new URL
II. Ranking-Safe Development
During the build, we:
1- test on a password-protected copy
2- copy metadata and schema onto each template
3- meet agreed Core Web Vitals targets
III. Launch Support
On launch day, we:
1- deploy redirects
2- verify them by crawling
3- submit the sitemap
4- inspect URLs
IV. Post-Launch Monitoring
For 90 days, we:
1- track Search Console and conversions
2- fix problems the same day
Planning a website redesign in Dubai? Book a free consultation and we’ll review your current site before a single page is redesigned.
Website Redesign Checklist FAQs
Can I redesign my website without losing Google rankings?
Yes. Most sites keep their rankings when they keep high-value URLs unchanged, redirect each changed URL to its closest new page and copy metadata across. Sites lose rankings through broken URLs, missing redirects, removed content or accidental noindex tags.
How long does it take to recover rankings after a redesign?
After a well-run redesign, Google usually takes a few weeks to recrawl your moved pages, and rankings settle during that time. Larger sites take longer. If rankings keep falling after a month, check for redirect errors, deindexed pages or removed content.
What is a 301 redirect and why is it important?
A 301 redirect permanently sends visitors and Google from an old URL to a new one. As a result, Google lists the new address, and ranking signals and backlinks follow the page. Without it, visitors reach an error page and the old URL loses its ranking history.
Should I keep my old URLs or change them during a redesign?
Keep the old URLs of pages that rank or have backlinks. Change a URL only when the current address is confusing, duplicated or broken, because every URL change adds risk to your Google rankings.
How do I know if my website redesign hurt my SEO?
Compare Search Console clicks and impressions for your top pages four weeks before and after launch. Next, check the Pages report for rising 404 errors or newly excluded URLs. Then crawl your old URL list to confirm the redirects work.
Do I need an SEO expert for my website redesign?
For a small site with stable URLs, a careful owner can follow this checklist alone. For large, bilingual or ecommerce sites, or planned URL changes, involve an SEO team that has run migrations before.
Want Your Redesign to Keep Your Google Rankings?
Customers should find your business more easily after a redesign. Digital Gravity, a Dubai web design and development company, makes sure they do. Not sure who should run your project? Read how to choose a web design agency in Dubai, or get in touch with us today.
Start Your Redesign Project · Contact Digital Gravity
Tool menus, limits and thresholds in this checklist were checked in September 2026 against Google Search Central, Search Console Help, web.dev and Screaming Frog.